Navbar

Image Map
Showing posts with label Alex. Show all posts

Sunday, January 4, 2015

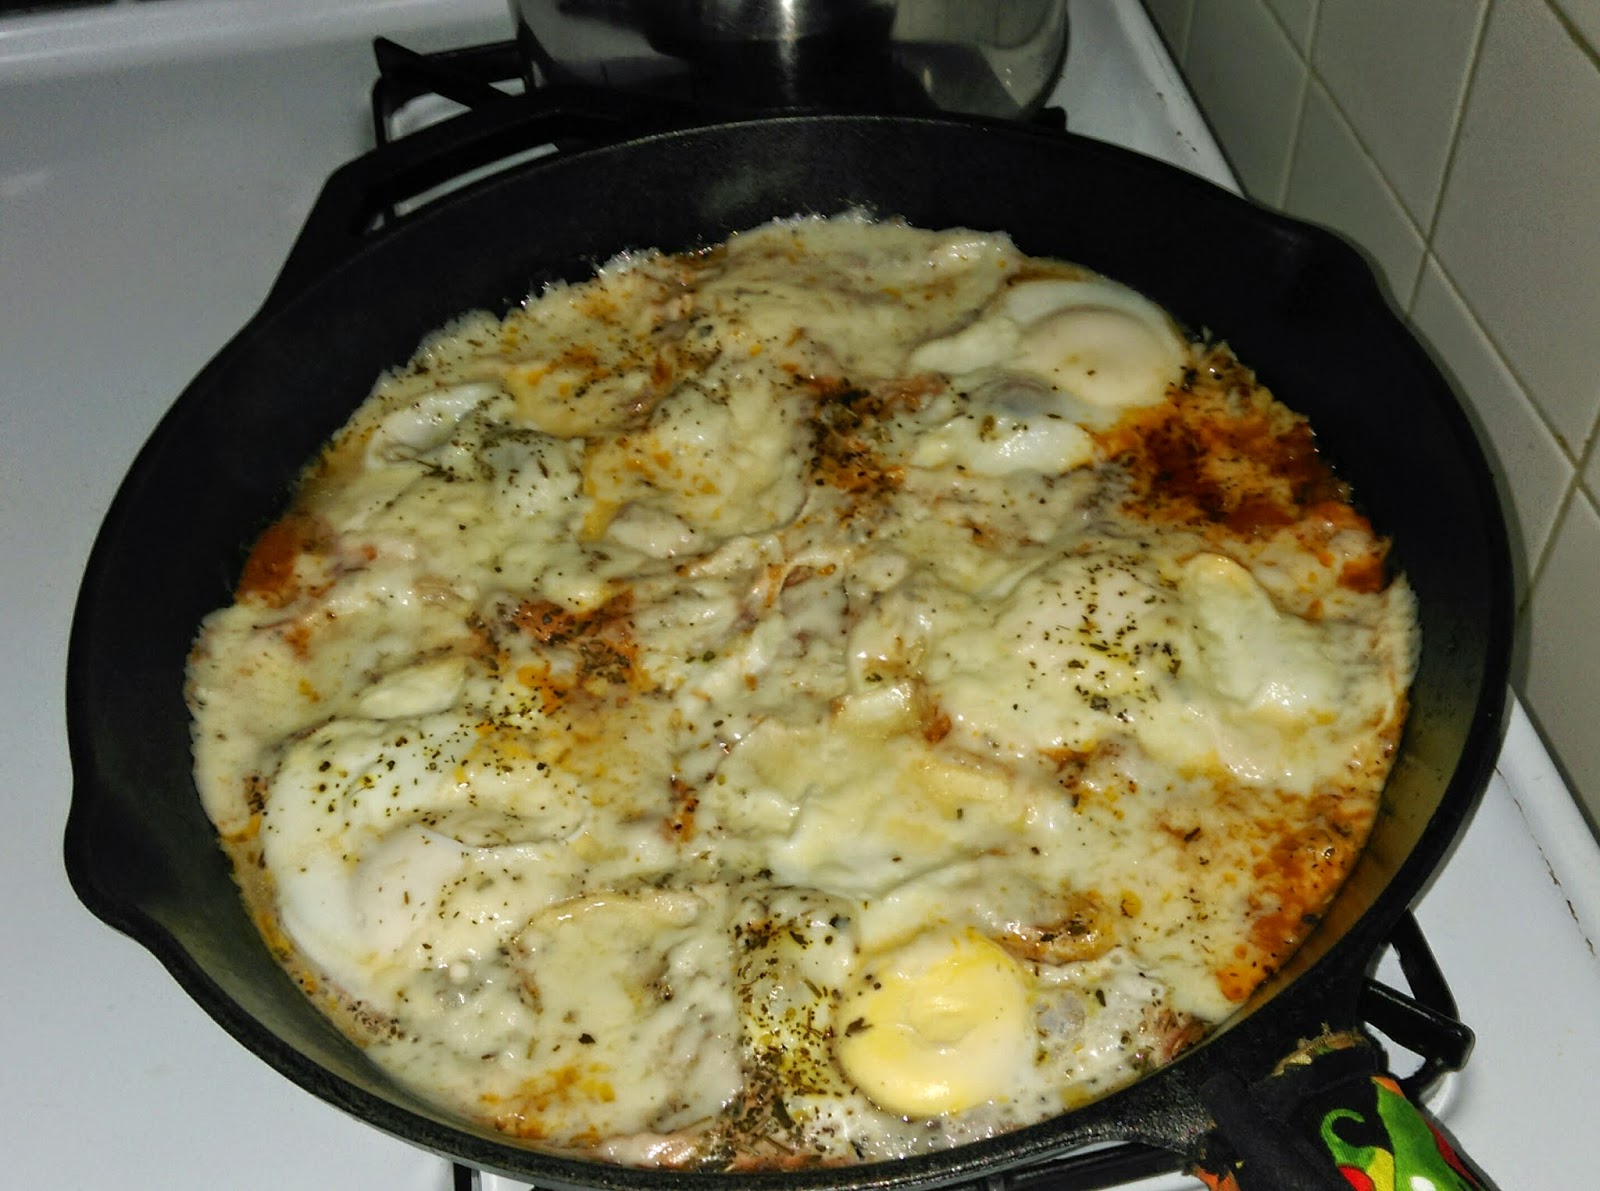
Happy New Year 2015! Enjoy some Spicy Egg and Tomato Skillet Casserole!

HI! It's been so long! A lot of things happened in 2014 and now I'm ready to shrug everything off and eat healthier this year.

A good start is this recipe, which we made today for Sunday brunch. It's another one of my "this is all the stuff I've got in the fridge, what I can make out of it?" recipes. It turned out amazing and I even got to enjoy one of Ja's Old Bay rimmed Bloody Marys while I cooked.

Jasin makes the BEST bloodies!
 This casserole is extremely filling, low carb/keto, and (most important) yummy!

Spicy Egg and Tomato Skillet Casserole

(serves 6-8 normal people or 3-4 VERY hungry people)

  • 2 small onions
  • 3/4 cup cooked kale
  • 1/2 can Goya chipotle peppers in Adobo sauce *
  • 1 tablespoon Kerrygold salted butter
  • 1/2 cup sugar free tomato sauce
  • dried parsley to taste
  • dried oregano to taste
  • dried basil to taste
  • 6 large eggs
  • approximately 8-12 small thin slices of fresh mozzarella cheese (I think feta would work very well here too, but didn't have any today)

* NOTE: If you don't like spicy food, you can replace the chipotle peppers with about 1/3 cup of mild salsa or chopped tomatoes.

1.) Roughly chop the onions, kale and chipotle peppers. I used my Ninja appliance because I'm lazy.


2.) Melt the butter on the skillet on medium heat, making sure to coat the entire bottom of the pan.

3.) Being careful not to burn the butter, spread the vegetable mixture evenly on the skillet and cook until the onions became nearly transparent.


4.) Evenly spread the tomato sauce and spices on top of the vegetable mixture and let it saturate. Do NOT let this boil - keep on a level medium heat.


5.) Crack your eggs one at a time into a small measuring cup and pour each one carefully from the cup into the pan (this helps ensure the eggs are evenly distributed).

6.) Once the egg soaks in and the whites begin to lose transparency, arrange your slices of mozzarella around the eggs.


7.) Cover the casserole with a lid or some tinfoil and let cook for 5-10 minutes more - if you want yolky eggs, err on the shorter side. For completely set egg yolks you may need to let cook for a little longer than 10 minutes. We did about 12 minutes, as Ja likes his eggs hard. (...that's what she said?)

While the casserole cooked, I had time to fry up a few small slices of bacon as a side dish. 
AND DONE:


We really enjoyed this and it only took about 25 minutes to make on a leisurely Sunday afternoon. Added bonus - it made a LOT, but it's so good we'll probably end up eating more for dinner (and maybe for my lunch tomorrow) !

SO GOOD! 
Hope you like this! To your health and happiness in 2015!

Φιλάκια,
Alex

Friday, February 21, 2014

More Tips for Keto/Low Carb

I was inspired by Eleni's very informative post and thought I would add my two cents.
 
MY KETO STORY

After stumbling upon the /r/keto subreddit and doing some preliminary research, I started a ketogenic diet in April 2011. My goals were completely vain -- at 5'9" and 160 pounds, I was bigger than I was used to (especially around the stomach) and wanted to lose weight fast without being hungry and still being able to eat things like mayonnaise and eggs and salami. Using MyFitnessPal as a macronutrient and calorie counting resource, I made sure I was eating no more than 1600 calories per day and that my nutrient ratios were 65% fat, 25-30% protein, and 5-10% carbohydrate. I rarely went over 50 net carbohydrates per day and I diligently tracked every morsel and each liquid that passed my lips.

By the end of May 2011, I lost almost 20 pounds and had the nicest physique I had ever had, without doing any extra exercise (just my regular NYC walking and twice weekly Simple Fit workouts). Some of this result is due to genetics -- my family tends to have defined, lean muscles even at higher body fat rates and we tend to be lean overall -- but I'd say 80% was just eating keto.

I lost a few more pounds (at my lowest ever -- 135 pounds) and then maintained this weight and physique using a ketogenic diet and rigorous boot camp training and weight lifting (exercising 5-6 days per week) through November 2012 (because I was exercising more, I relaxed my nutrient tracking and allowed myself more calories).

However, I got engaged in September 2012, and then fell prey to holiday food in November and December. I was having a hard time at my job and our apartment had some serious structural problems (our bathroom ceiling caved in!), and I used that as an excuse to get lax with diet and exercise.

With the stress of getting married, changing jobs, moving, setting up our new apartment and getting used to my new position at a new firm, I completely neglected my eating habits and exercise regime for basically an entire year. By September 2013, I was the biggest I have ever been in my entire life -- 180 pounds. Getting back into my  healthy habits has been a struggle. But keto has been a miracle for me, once again. I'm now down to about 150 pounds (still have 15-20 pounds left to lose). My exercise habits have not bounced back yet -- but that 30 pounds of weight (even while being somewhat inconsistent) have melted off with keto.

All that story is to preface 3 key things I've learned from doing a very low carb/ketogenic diet on and off for the past three years.

NUMBER ONE
Consistency Is Key

Keto is awesome, but if you go "off the wagon" and eat sugar/grains/starchy food on even a semi-regular basis, along with all the fat and protein you are used to, you WILL gain all the weight back and FAST. If you want to transition out of a ketogenic diet, I would recommend doing so like Eleni does and still "eating clean" with your carbohydrates coming from potatoes, sweet potatoes, fruit and whole grains like oats and quinoa. If you transition out of keto, you will also need to cut back on fat intake. The whole point of a ketogenic diet is fueling your body on fat. But if you add more carbohydrates, you are basically confusing your body -- it will start to run on glucose again and instead of metabolizing fat you are keeping the extra fat you are eating.

If you do keto, get keto adapted, and then abruptly start eating thoughtlessly like I did (New York City pizza and Chinese takeout, anyone?), you will pile on the pounds but quick. I ended up being TWENTY POUNDS HEAVIER than I ever was in my entire life by being inconsistent with keto. 

NUMBER TWO
Fat Is Your Friend
 
Make sure you are eating A LOT of fat. Err on the side of too much fat (and very low carbs)! Fat keeps you full, in a good mood, and fuels your body on keto. Scrumptious, fatty, luscious avocados will become your favorite fruit. I always stock up and then refridgerate once ripe to have a big supply. Here's one of my favorite keto snacks:
 
 
All that is? Half an avocado with a scoop of full-fat cottage cheese! It is AMAZING and the macronutrient ratios are almost perfect. You know I'm lazy -- I just bring an uncut avocado and a little container of cottage cheese from home, cut the avocado in half at work, plop the cottage cheese on top in work kitchen and DONE. It's gobbled at my desk with a spoon on days where I'm busy. If I want to make a lunch of it, I'll eat both halves and double cottage cheese. If not, I'll wrap other half of the avocado for next day. It's around 600 calories total for a full avocado.
 
Another thing is to always have a fat pick-me-up around, especially when you are first getting keto adapted. This helps keep you satiated AND sane. I always keep this in my drawer at work:
 

PORK RINDS. They are amazing source of fat, have no carbs, and you feel "normal," like you are getting a nice, potato chip-like snack (especially if co-workers eat garbage snack food around you).
 
NUMBER THREE
Alcohol is NOT Your Friend
 
You CAN have alcohol on a ketogenic diet -- but basically only sparing helpings of dry red or white wine or hard liquor with mixers like plain seltzer and Diet Coke. However, please take it from me: your alcohol tolerance is SEVERELY limited on keto! Your body is running on ketones for fuel and because of this, your body metabolizes alcohol completely differerently.
 
Where before I could have 3 or 4 mixed drinks over the course of a weekend night out on the town and be completely fine the next day with no hangover? On keto that is a recipe for being blackout drunk, not remembering anything past the first drink, and waking up with the worst head-pounding-stomach-churning-just-plain-evil hangover EVER. Trust me, I found this out the hard way this Valentine's Day. My husband was not too amused about me first drunkenly dancing around the apartment and then not being able to function after two drinks! Not to mention having to help me through the next day's earth-shattering hangover.
 
I don't care WHAT your tolerance is on a normal diet -- I guarantee you that you will be an EXTREME lightweight on keto.
 
Basically, if you want to drink, please be careful. On keto I can get a buzz off a single drink. The problem is not knowing your limit because you are used to drinking more, or gettting so buzzed off a single drink that you decide you want to drink more "for fun." Trust me, next day will be the least fun day of your life.
 
Please, please, please: pace yourself and be smart about your alcohol intake while on a low carb or keto diet.
***
 
I hope that, through my own trial and error, you may glean some insights that will help you with your diet regimen!
 
Keto is amazing, but like anything, it's not a magic wand -- it takes work and thought to gain the most benefits.
 
As always, please let us know if you have any questions -- we love to hear from you. Also, I think Eleni and I will be focusing on some "crunchy" home beauty secrets in our next round of posts. Stay tuned!
 
-Alex

Monday, December 2, 2013

Keto Shepherd's Pie Casserole

Continuing our long-running penchant for ground beef and cauliflower: I whipped this up on Wednesday night. This is a filling and delicious Winter comfort food while being healthy, keto, and very low carb. Also, you get some nice Greek-style tastes here from the olive oil melted garlic, onion and peppers!

Keto Shepherd's Pie Casserole
  • 1 1/2 lbs. ground beef
  • 2 green peppers
  • 2 yellow onions
  • 4 cloves garlic
  • 1 large head of cauliflower
  • 4 tablespoons unsalted butter
  • 2 tablespoons extra virgin olive oil
  • salt, pepper, cayenne pepper to taste
  • cheddar cheese

1.) Finely chop peppers, onions, and garlic. Sauté salted vegetables on medium high heat in olive oil until onions and garlic are "melted" and translucent.

2.) While veggies are cooking, remove outer leaves and stem of cauliflower. Roughly chop up the cauliflower. Boil chopped cauliflower in salted water. Make sure the boiled cauliflower is still firm and not mushy -- you want your faux-tato casserole topping to be creamy, not watery. Drain cauliflower.

3.) Once vegetables are cooked and melted, add ground beef and salt and pepper to taste. Brown meat in vegetable mixture.

3.) Add salt, butter, and pepper to taste to your boiled, drained cauliflower. Then mix all in food processor or blender. (I used my trusty Ninja!) Set faux-tato mash aside.

4.) Once meat mixture is cooked, layer meat evenly into a casserole pan.


5.) Evenly spread your faux-tatoes on top of the meat mixture.
 

Pro Tip: A flexible spatula is the best way to get a nice and even layer here. It's useful for lots of things, really, including icing baked goods. We have a great set of silicone spatulas in three different sizes. Bonus when using silicone spatulas: they don't melt at high heat!


6.) Grate cheddar cheese and sprinkle on top of the casserole. I did this because cauliflower does not brown the way potatoes do in a traditional Shepherd's pie -- cauliflower lacks the starch to do so. The melted cheese on top basically completes the "look" of the pie. It's also delicious! I also lightly sprinkled on some cayenne for the same reasons (and you know how much I love cayenne!)


7.) Bake casserole in oven for 25 minutes at 375 degrees. Keep an eye out, though...if the sides start bubbling over, take it out ASAP!

8.) Admire your pretty pie.


9.) EAT!

Pro Tip #2: Wait about 5-10 minutes to let this cool down and use your large silicone spatula to cut squares and serve (as you can see from the above picture, I was in a rush and hungry and didn't take my own advice at first...). This casserole really stays together and looks nice. It's also very easily reheatable!

I hope you enjoy this recipe as much as Bear and I did! Let us know what you think in the comments!

-Alex

Wednesday, November 20, 2013

Keto Jalapeño Bacon Cheeseburger Stacks

It's amazing the deliciousness you can create when you are forced to use your ingenuity. My husband and I collaborated last night to create the following meal, using only the dregs of our nearly grocery-less refridgerator. (It also helps to only buy keto-friendly items on the regular!)

Yumminess embodied.
Jalapeño Bacon Cheeseburger Stacks (served on Garlic Cauliflower Mashed Faux-tatoes)

For the Stacks:
  • about 3/4 to 1 pound ground beef
  • 1 large jalapeño pepper
  • 4 cloves garlic
  • 1 large egg
  • salt and pepper to taste
  • 3 slices thick cut bacon, each slice cut in half
  • 8 large "button" shaped portabella mushrooms
  • cheddar cheese (we didn't have slices, we cut off a block, it looks a little silly in the pics, but it melted down beautifully)
  • little bit of olive oil to lightly grease burger pan
  • dill for garnish
For the Faux-tatoes:
  • 1/2 to 3/4 of a head of cauliflower, roughly chopped
  • 2 cloves garlic
  • 4 tablespoons butter
  • salt to taste
Serving Size: 2
Preparation and Cooking Time: approximately 40-45 minutes

1.) Finely mince the jalapeño pepper and garlic. We used our Ninja chopper.


2.) Mix ground beef, mixed veggies, spices and 1 egg well in a large mixing bowl, until beef shows no signs of texturization and is "sticky" to touch.


3.) Start boiling some water for your cauliflower. At a good, roiling boil, add the cauliflower and a bit of salt. Cauliflower should boil until tender, but not mushy. You want a nice and hearty mashed faux-tatoes, not gruel! Ours took about 10 minutes. 

 
4.) As your cauliflower boils, evenly form your meat into 4 patties and place in a greased pan to cook. Eleni has a George Forman grill (which I am jealous of and which would make the burger cooking process easier) but cooking on a stovetop works just fine. Simultaneously start cooking your halved bacon slices in another pan.


How awesome are our cast-iron pans? They are non-stick, work wonderfully and create less mess!


5.) With one eye on your busy stovetop, chop up your mushrooms and get your slices of cheese ready for the stacking, which is coming soon!

6.) Bacon cooks fast! Place your cooked bacon on a small, paper towel covered plate to the side. Then immediately add the mushrooms to the hot bacon grease to cook.

7.) Make sure you flip your burgers as needed and get your cauliflower off the stove as soon as it is tender. Transfer the cauliflower and all the other faux-tatoes ingredients to a food processor and blend well. (We used the large Ninja blender for this).

8.) Make sure burgers and mushrooms are completely cooked to your temperature and taste specifications. We cooked the burgers medium well and only lightly sauteed the mushrooms. Obviously, there are many possibilities.

9.) Stack time! First is a generous portion of faux-tatoes. Then place a burger patty on top of each faux-tato portion. Top this burger with cheddar. Place the second patty on top of the cheddar. Place your bacon on top of the second burger patty. Top the whole shebang with freshly sauteed mushrooms. We then garnished with a bit of dried dill.


Pure joy for your mouth.

 
I really can't overstate how awesome these were. They were quickly devoured as we made "mmm" noises and nodded haughtily at one another, proud of our last minute creation.
 
Enjoy!
 
-Alex
 
P.S.
 
I am planning to make a bunch of low-carb/keto Greek food soon. Including an experiment with low-carb phyllo dough (I think of it as Franken-Phyllo...). Stay tuned!

Friday, November 15, 2013

Crockpot Hot Pot Chicken

I have been excited for this recipe for awhile now. It exceeded my greatest expectations; honestly, this was the best chicken I have ever cooked.

Quick backstory: Bear and I eat Chinese hot pot quite frequently with our friends R. and S.  S. is from Beijing, and introduced us to hot pot at a restaurant in Midtown a few years ago. We were instantly hooked and often meet up with them and other friends to share a hot pot.

R. and S. have recently settled into a beautiful, huge apartment in Brooklyn and invite us over fairly frequently for S.'s awesomely delicious, homemade hot pot. Hot pot is all about the seasoned broth -- she prepares her broth in a neat pot with a divider. On one side is mild, delicious pork broth.  On the other side, hot and spicy broth. The last time we went, S. gave me a packet of the seasoning she uses for the spicy broth side of the hot pot, and I have been itching to use it ever since.


(The price for this on Amazon is, frankly, shocking to me, because S. picks up packets of the same spice mix at a Chinese grocery store for $1.99 each!)

I figured I would marry two of my culinary loves -- hot pot and the crockpot -- into one delicious hodgepodge.

Crockpot Hot Pot Chicken

  • 1 three-pound to five-pound roasting chicken (basically a chicken big enough to fit nicely in your crockpot and still be able to close the lid)
  • 1/2 packet Baijia hot pot seasoning (Note: this stuff is STRONG and SPICY.  I only used half of a packet for the entire chicken and that was perfectly enough.)
  • 1 large onion
  • olive oil to grease crock pot base
1.) Cut the onion into pieces and layer on bottom of greased crockpot base. This is a protective layer to keep chicken skin from burning into the ceramic base and keep juices circulating as the chicken slow cooks.


2.) Remove giblets from chicken's body cavity and cut off any excess skin (if necessary). However, I decided to just put the giblets into the crockpot. I LOVE chicken neck and liver and figured they would taste incredible in the seasoning too. I was right.

3.) Rub down chicken with hot pot seasoning, careful to make sure some seasoning is applied inside the body cavity and also in every nook and cranny of the chicken.


4.) Place the chicken breast side up in the crockpot on top of the onion protective layer.


...and that's it! Preparation time was only 10 minutes. I covered up the chicken and put it in the fridge. The next morning I took the seasoned chicken out of the refridgerator and plugged in my crockpot on the "Low" setting.

I came home 8 hours later to this lovely smelling bird:


We served our juicy hot pot chicken over fresh riced cauliflower, sauteed in a little bit of butter and garlic. Yes, actually fresh (not frozen) cauliflower. It only took about 15 minutes to get the right consistency. Maybe I am getting less lazy!


This was one of the best meals of my year. Seriously. And it was so incredibly simple -- it took 10 minutes to prepare and was ready when I got home from work! You really can't beat that.

As soon as we pick our hot pot birdy clean, I am going to boil down the carcass into some nice spicy chicken stock using (of course!) the crockpot. Maybe I'll use the stock to make some of that jambalaya Eleni recommended!

Enjoy and let us know what you think.

-Alex

P.S.

Some of you out there, like Eleni, may not like spicy food. You can still make this recipe using mild hot pot soup base. Just as flavorful, but less piquant.

See:


Again, if you have a Chinese grocery store nearby, you're better off getting your packets there -- they are much cheaper!

Thursday, November 14, 2013

Easy (low-carb/keto) Crockpot Meatballs

I love to use the crockpot in the wintertime! So here's another crockpot recipe. Fair warning: there's probably going to be a lot of crockpot-centric recipes posted here in the next few months.  


We made these delicious meatballs yesterday, and they are now all gone. This is totally on Bear, by the way. I only got to eat, like, 4 of them. Very quick to prepare (and eat!)

Easy Crockpot Meatballs
  • 1 1/2 to 2 pounds ground beef
  • 1 medium onion
  • 4 cloves garlic
  • 2 large eggs
  • 1 tablespoon almond flour (a substitute for traditional breadcrumbs)
  • spices to your taste -- I (of course) used a bit of cayenne pepper, some salt and pepper, and a dash of steak rub.  If I had had some oregano, I think that would have been nice.
  • enough olive oil for browning in pan and to grease crockpot
1.) Mince garlic and roughly chop up onion.

2.) Mix vegetables with all other ingredients in large mixing bowl, until meat is not texturized any longer and is "sticky" to touch.

 
3.) Roll meat into balls of your choice size.  Mine were about 1 1/2 inch or so diameter. You can do little mini-balls or big oval sized keftedes (Greek meatballs). I use my hands, but you can use a meat-baller if you like. Eleni HATES touching meat, so this is something she could use:


4.) Lightly brown meatballs on medium-high heat on olive oil greased pan (this took me two rounds to do with about 1.6 pounds of meat).


Blurry balls!
5.) Transfer your meatballs to the greased crockpot. 


All the balls should lie flat in the base of the crockpot.


From there it's just plug and play! I put these in the fridge overnight, then cooked these on "Low" for about 7 hours, starting when I left for work in the morning the next day. They are hearty and tasty (and now completely gone). You can eat them as is, or dress them up with various sauces or sides.


We took the lazy route (as always!), and I cooked a bag of chopped, frozen broccoli cuts in a jar of alfredo sauce. Then we melted some mozzarella over the whole shebang.

YUM!
This recipe was quick, easy, ready when I got home from work, super filling, and--of course-- low-carb/keto friendly.

The only problem is that Bear eats it all so fast!

Enjoy and see you next time. As always, we'd love your comments and suggestions.

-Alex

Monday, November 11, 2013

Lazy person's quick and easy Winter Low-Carb Beef Stew

It's getting cold out and the shorter sunlight hours are wreaking havoc with my regular habits. By the time I get home from work -- after trudging down the hill from the subway station in the dark -- I just want to eat something, do an errand or two, and SLEEP.

To that end, I've been trying to prepare food early in the week that will be ready when I get home. Because I'm basically pathologically lazy. I prepared this recipe last night. I'm looking forward to eating this hearty stew when I get home tonight (and probably for the rest of the week!).

Winter Low-Carb Beef Stew
  • 1 1/2 - 2 pounds cubed beef stew meat
  • 8 large "button shaped" portabella mushrooms
  • 1 bunch celery hearts
  • 1 small zucchini
  • 1 large onion
  • 6 cloves garlic
  • 2 packets Goya beef boullion
  • 8 cups water
  • salt, pepper, cayenne pepper, garlic powder, cumin to taste


1.) Chop all vegetables into chunks and place in crockpot.


2.) Sprinkle boullion on top of vegetables.  
                 

3.) Using kitchen scissors (my favorite cooking implement!), cut the stew meat into chunks.  Remember, the beef will shrink as it cooks, so you don't want to make the chunks too small.


4.) Add water and spices and stir well. (You might be asking of the below photo -- where's the beef? Well, before the stew is cooked completely, the vegetables float and the meat sinks in the water!)


This whole process literally took 15 minutes. After I assembled the stew, I just put the lid on my crockpot and put it in the fridge.  Note: my crockpot base separates from the ceramic bowl, so I don't have to put the part of my crockpot that plugs into the wall into the refridgerator!


This morning before work, I took the stew out of the fridge, put the ceramic bowl ino the crockpot base, plugged it in and turned the dial to "Low."  When I come home (about 9 hours or so later), baby, I'll have a stew going!

I'll post pictures of the final product tomorrow.  [Edit- here it is!  Hearty, meaty and filling. The mushrooms are especially savory. I'm having leftovers for lunch today!]


I make this recipe fairly frequently in the winter.  It tastes better on the 3rd or 4th day, too!

Enjoy and stay warm!

-Alex

Wednesday, November 6, 2013

Halloween Highlights!

The older I get, the less I go out on holidays. Mostly for money reasons, but I also firmly believe that Halloween is one of the biggest "amateur nights" out there, especially in New York City. Being smushed into costumed, drunken revelers and paying $12 for a cocktail is not my idea of a good time.

So, on holidays like this, my husband and I have to make our own fun. Bear is an artist and he obsesses over teeth and skulls in his work. So, as a Halloween treat, I bought us a 4D skull puzzle. I figured we'd assemble it together and then Bear could use it as a model for his art. 


But before we could get to the main event, Bear surprised me with a pumpkin! While I was at work, he went on a pumpkin search to every grocery store in the neighborhood, to no avail. He was even told by a shopkeeper that "There are no pumpkins in the 'hood!" However, he spied a pumpkin in a display window on his way back to our apartment. Ten minutes of negotiation and five dollars later, he was the proud owner of a lopsided, weirdly shaped pumpkin!

When I got home from work, we popped open a bottle of wine and got to work on Jack's lobotomy. I suggested we use the pumpkin's weird shape to our advantage and "Drunk Jack" was born!

He's "tipsy."

We decided to use all of Jack's parts wisely and made roasted pumpkin seeds and Crustless Keto Pumpkin Pie from our drunken friend's innards.

Drunk Jack's Roasted Pumpkin Seeds
  1. Clean freshly scooped out pumpkin seeds in clear, cold water and pull stray pumpkin strands off of the seeds.
  2. Lightly grease a glass casserole pan with unsalted butter.
  3. Coat wet seeds in a mixture of salt, Old Bay seasoning, and garlic powder to taste.
  4. Roast in oven at 350 degrees Fahrenheit for 15-20 minutes or until nicely browned.

Breaking Bad-esque upshot!
 
These seeds smelled delightful, and the two I popped in my mouth were tasty...but I forgot to turn off the stove and the rest of the seeds burned to a crisp :-(

The reason for my fatal pumpkin seed error (other than my wine intake)? We were assembling the skull!

Spooky skull parts!
"Agent Dana Skully"

Disappointed by my lost pumpkins seeds but fortified by wine and our new skull friend, I decided to try my hand at making some pumpkin pie! 

I oven roasted Jack's innards in the same glass casserole pan until the pumpkin was soft to the touch (about 15 to 20 minutes).  I had to adapt this recipe after my first attempt at pie (following the linked recipe to the letter...) devolved into a soggy pile of pumpkin goo. 

Crustless Keto Pumpkin Pie
  • 2 cups fresh roasted pumpkin, pureed in blender
  • 3/4 cup heavy cream
  • 3 large eggs
  • 1 teaspoon cinnamon
  • 1/2 teaspoon cloves
  • 1 heaping tablespoon Sweet Leaf powdered stevia

  1. Mix all ingredients together in a large mixing bowl.
  2. Pour mixture evenly into greased glass pie pan (I used unsalted butter).
  3. Bake at 375 degrees for 45 minutes, or until top of pie is browned and a toothpick can be inserted and come out clean.

We ate half of it before I could get a picture!
Jack's insides gave us enough pumpkin to make 3 pies -- one sad, failed pie and two perfect, delightful, deliciously keto pies!  I love the taste of pumpkin, and the amount of stevia I used gave just a hint of sweetness.  If you prefer a sweeter tasting pie, I would say another tablespoon or two of stevia should be used.  Bear ate an entire half of one of the pies and topped it off with fresh whipped heavy cream with a bit of cinnamon. 

All in all, our Halloween was very fun. After all the arts, crafts, and baking, we lit Drunk Jack up and watched a couple episodes of "The X-Files" by jack'o'lantern light.

Drunk Jack has now been thrown away, but I think we will be doing some more pumpkin experiments soon.  Bear brought this home on Monday:

Kitty not included...
Hope you had a happy Halloween and kαλή όρεξη!!

-Alex
 
P.S.
 
Check out T-Rex's costume!
 
Q: How many licks will it take the T-Rex Owl to get to the center of her Tootsie Pop?
A: She'll have to learn to take the paper off first! ;-)


Friday, October 18, 2013

Keto "I Need to Go Grocery Shopping" Bacon Broccoli Soup

I'm a pretty lazy person but I'm tired of being pudgy, so I'm doing the keto diet and trying to eat healthy.  The other night Bear and I were feeling peckish, lazy, and cheap.  Take-out was out of the question, but so was leaving the apartment to go to the grocery store.  So I rummaged through our sparsely stocked refrigerator and came up with this fast and easy recipe!
Ingredients
All ingredients, as per usual, were eye-balled and tweaked to me and Bear's taste.
  • 4 strips bacon
  • some end pieces of gourmet cheese (I forget what kind...Bear would kill me...) from Murray's Cheese Shop
  • beef stock
  • 1 container frozen chopped broccoli
  • Kerrygold unsalted butter
  • tablespoon of mayonnaise
  • garlic pieces
  • salt, cayenne pepper, onion powder to taste
BACONNN
First I fried up my bacon to a medium crispy state...do NOT get this too crispy unless you like having to chew creamy soup!
image_2
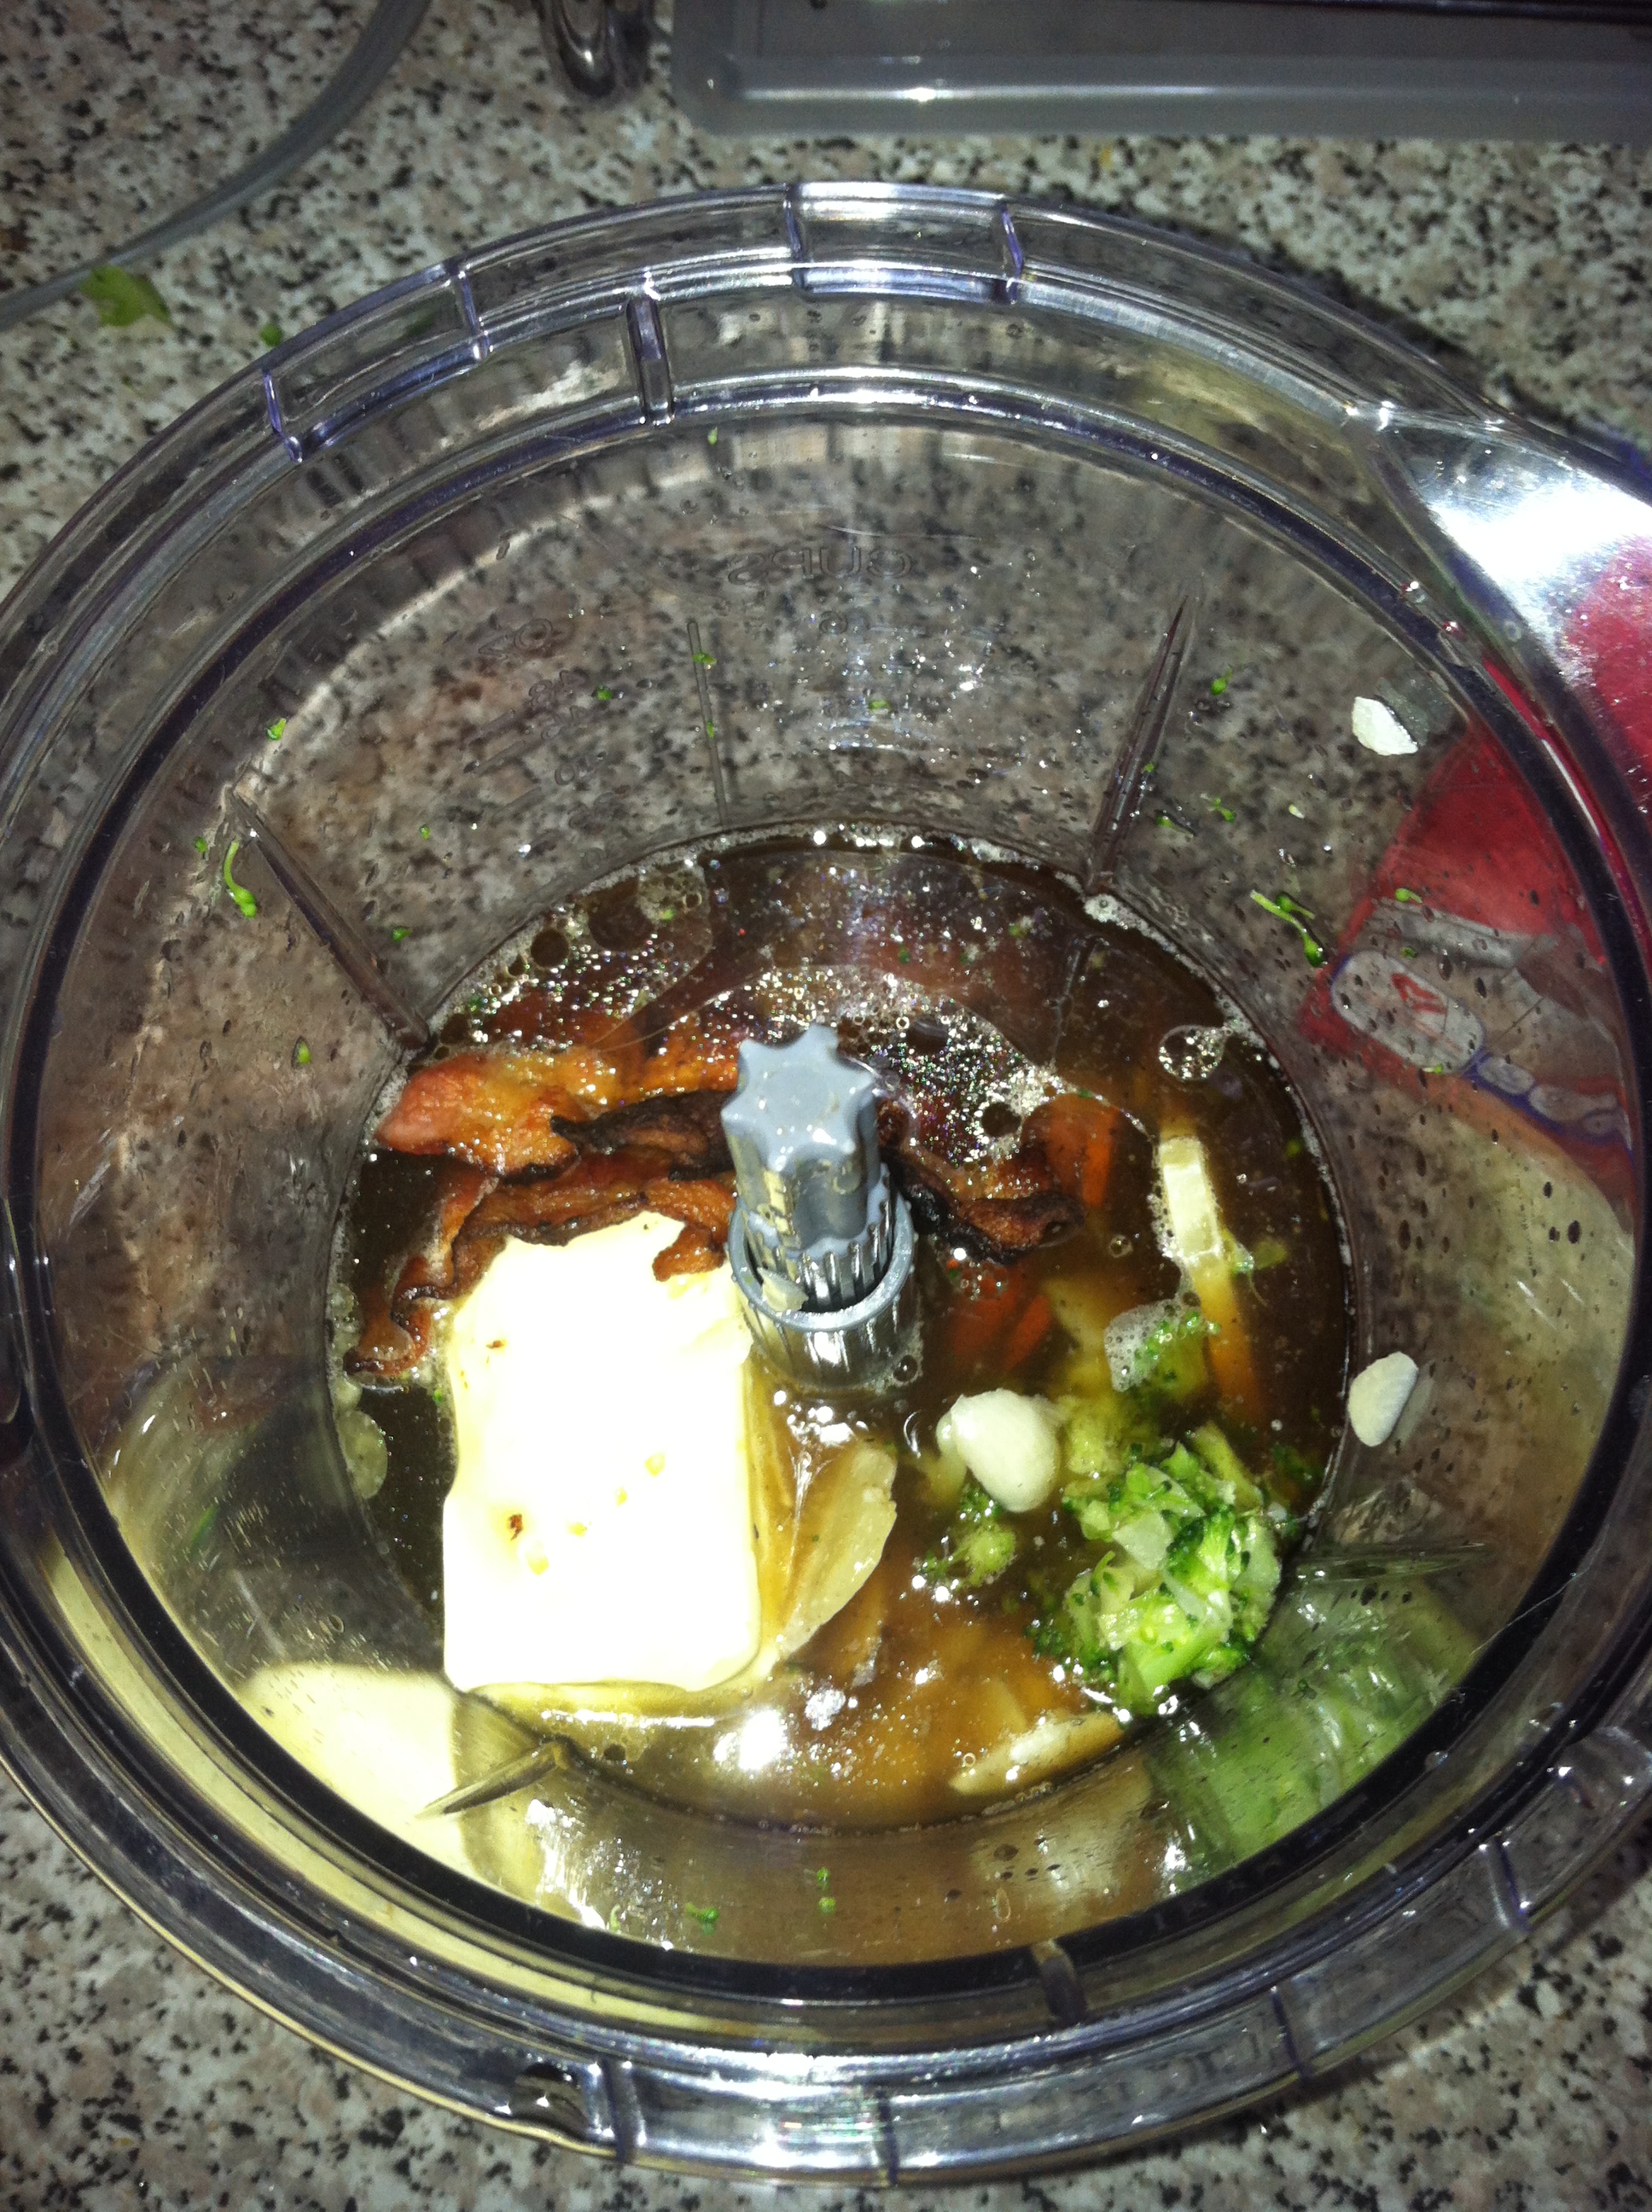
Then, in my awesome Ninja blender, I put about 2 cups of beef broth, cheese, the broccoli, butter (about 3 tablespoons worth), mayo, garlic pieces, and the cooked bacon WITH the bacon grease.  You gotta get that good fat on keto!
image_3Ninja the hell out of the whole thing!
image_4The result will be kind of clumpy, but that's okay because you are going to let it cook for about 10-15 minutes on medium heat.  The cheese and butter will fully melt, and everything will get nice and mixed.
image_5
After 10-15 minutes, your soup should be nice and frothy.  Put the heat down to low, and stir for a couple of minutes.  This will ensure that the butter, cheese, and bacon grease doesn't separate from the broccoli puree and broth.
image_6Take that frothy, fatty goodness and put it right back into your Ninja for a good, thorough blending.
image_7Told you I was lazy!  I try to use the least amount of dishes I possibly can.  In this case, all I used was a saucepan and the Ninja.  I just poured the soup directly from the Ninja into the bowls...soon after, right into my face.
image_8Because I like to spice things up, I added a little bit of cayenne pepper on top.  Voila!  A delicious snack/meal -- snack if you eat just one bowl, meal if you eat a couple (guess what me and Bear did?).
Laziness yields success sometimes!
-Alex